Mastering Oreshki: Your Ultimate Guide to Authentic Russian Walnut Cookies with Dulce de Leche Filling

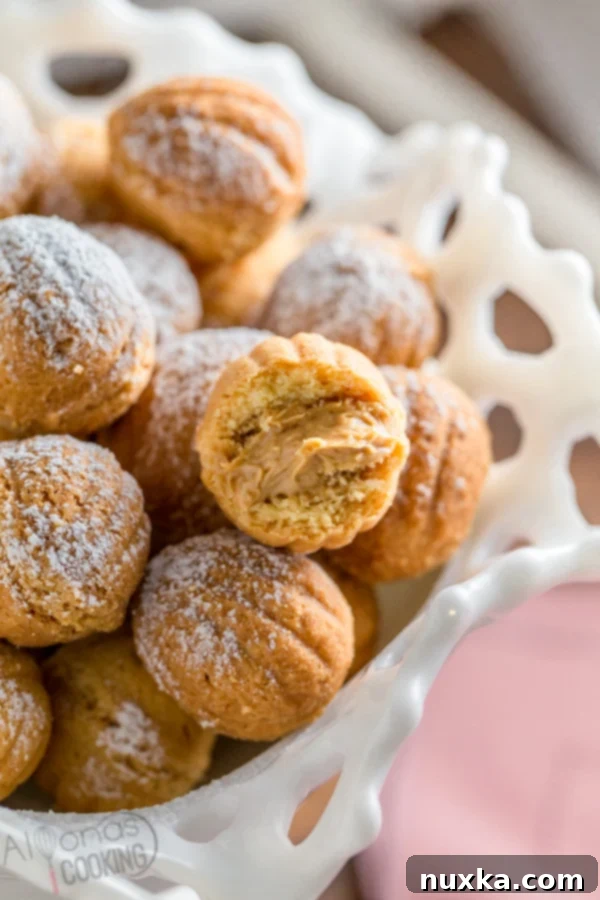
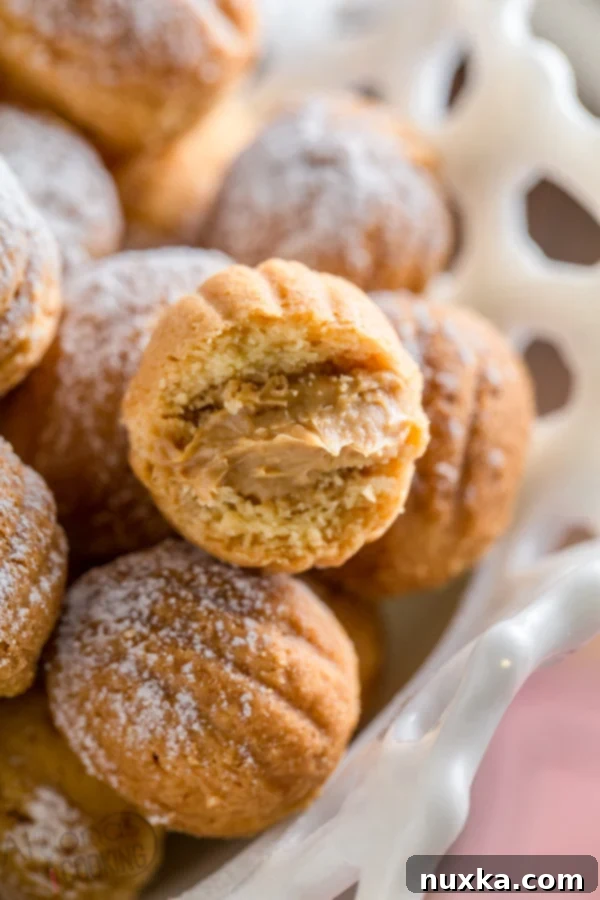
Step into the rich culinary heritage of Russia with Oreshki, also affectionately known as “walnut cookies.” These delightful treats are more than just a dessert; they are a cherished tradition, a symbol of warmth and celebration in Russian culture. Characterized by their distinct walnut shape and a luscious dulce de leche filling, Oreshki offer a unique blend of crisp texture and creamy sweetness that makes them utterly irresistible.
For many, the search for the perfect Oreshki recipe can be a long one. However, with the right approach – starting with a high-quality mold and using our exceptional four-ingredient shortbread cookie dough recipe – your quest for the ideal Russian walnut cookie is finally over. This guide will walk you through everything you need to know, from selecting the best Oreshki molds to mastering the art of baking and filling these iconic cookies.
Having experimented with countless Oreshki recipes over the years, we can confidently say that this particular formulation stands head and shoulders above the rest. The cookie shells bake up incredibly tender, almost melting in your mouth with a delicate flakiness. The filling, a rich concoction of dulce de leche, softened butter, cream cheese, and a hint of apricot preserves, achieves the perfect balance of thickness and flavor, cutting through the sweetness of the caramel for a truly harmonious bite. The secret to these perfectly shaped and consistently delicious cookies lies significantly in the mold you choose, making it a crucial component in your Oreshki-making journey.

Choosing Your Perfect Oreshki Mold: A Comprehensive Guide
The mold is the heart of Oreshki making, dictating the shape, size, and even the baking process of your walnut cookies. With several types available, understanding their nuances will help you select the ideal tool for your kitchen and baking style.
The Superior Oven Mold for Oreshki
In our experience, the oven mold stands out as the best option for crafting authentic Oreshki. Its primary advantage is its capacity: many oven molds can produce up to 40 perfectly sized shells in a single batch. This efficiency significantly speeds up the baking process, especially when preparing a large quantity of cookies for gatherings or holidays. While these traditional molds are often harder to find through mainstream retailers like Amazon, they are well worth the effort. For those serious about Oreshki, seeking out specialized kitchenware providers, such as nakkitchen.com, and reaching out via email might be your best bet to acquire one of these invaluable tools. Once you establish contact, placing an order and embarking on your Oreshki journey becomes much simpler. Using an oven mold provides consistent results, allowing for even baking and a beautiful, uniform appearance for all your walnut cookie shells.
Stove-Top Oreshki Molds: A Nod to Tradition
For those who appreciate traditional methods and a hands-on approach, the stove-top oreshki cookie mold offers a nostalgic baking experience. This old-school method is surprisingly quick, with direct heat allowing you to produce a batch of walnut cookies in approximately 6 minutes. While it requires more frequent handling of hot molds and closer attention, it can be a rewarding process. It’s important to note that these molds are specifically designed for gas stoves. One common challenge with stove-top molds is the potential for dough leakages during the cooking process if not handled carefully or if the mold isn’t perfectly sealed, which requires a bit of practice to master.
Individual Oreshki Molds: Patience is a Virtue
You can certainly find individual walnut cookie molds on Amazon or other online marketplaces. While they offer flexibility, the sheer volume needed for a typical Oreshki recipe (which often calls for around 156 cookie shells) can make this option feel somewhat daunting. To make the process manageable, you would ideally need to invest in at least 80 individual molds. Without a sufficient number, you’ll spend a significant amount of time waiting for batches to cool slightly before you can remove the shells and reuse the molds, making the overall baking process quite lengthy. Individual molds also tend to produce slightly larger shells compared to electric or oven molds, resulting in a heartier, more substantial cookie.
Electric Oreshki Molds: Convenience at Your Fingertips
Electric molds for walnut cookies offer a modern, convenient alternative, typically holding anywhere from 12 to 24 shells per unit. These devices plug directly into an outlet, providing consistent heat and simplifying the baking process. When using an electric mold, it’s often best to follow recipes specifically designed for its temperature and baking characteristics. A key consideration is the size of the shells produced; they often run slightly smaller than those from other mold types. While this might mean a slightly lesser filling capacity per cookie, the ease of use and consistent results can make them an excellent choice for home bakers.
Alternative: The Autumn Cakelet Pan for Larger Oreshki
For those looking for a unique take on Oreshki, some creative bakers, like “Let the Baking Begin” (see her approach here), have successfully used a Nordic Ware Autumn Cakelet Pan. This pan, while not specifically designed for Oreshki, can produce charming, different-shaped cookie molds. However, be aware that these pans typically yield much larger cookies, requiring adjustments to the dough portion and baking time. Amazon may frequently be sold out of this particular pan, so keeping an eye on sites like eBay might uncover one if you’re keen on exploring these delightful, oversized walnut cookie variations.

The Ultimate Walnut Cookies Recipe: Oreshki with Dulce de Leche Filling
This recipe is designed to yield approximately 156 cookie shells, which will make about 78 delicious, assembled walnut cookies. Perfect for sharing or for keeping a stash for yourself!
Ingredients for the Oreshki Cookie Dough:
- 4 sticks plus 3 TBSP (500 grams) of unsalted butter, softened to room temperature
- 6 hard-boiled egg yolks ONLY, finely grated (this is a key ingredient for tenderness!)
- 2 cups of powdered sugar
- 4 cups all-purpose flour
Ingredients for the Dulce de Leche Filling:
- 1 1/2 cans of dulce de leche (store-bought or homemade)
- 4 tbsp unsalted butter, softened
- 4 oz soft cream cheese, at room temperature
- 1 TBSP apricot preserves (adds a subtle fruity note and cuts sweetness)
How to Make These Irresistible Walnut Cookies:
- Prepare the Dough: In a large mixing bowl, beat together the cooked, finely grated egg yolks, the softened unsalted butter, and the powdered sugar until the mixture is light and fluffy. Gradually add the all-purpose flour, kneading until a soft, pliable dough forms. The dough should have a consistency similar to soft play-dough – easy to work with and shouldn’t stick to your fingers. If it’s too sticky, add a tiny bit more flour; if too dry, a tiny bit more butter.
- Shape and Bake the Shells: Preheat your oven to 375°F (190°C). Using a teaspoon measuring scoop, portion the dough into small, uniform balls. Press each ball into the cavities of your chosen oven mold, ensuring an even layer. Bake the cookie shells for approximately 25 minutes, or until they are lightly golden brown at the edges and firm to the touch. Baking time may vary slightly depending on your oven and mold type.
- Cooling and Removal: Once baked, remove the mold from the oven. Allow the cookie shells to cool in the mold for about 3 minutes. This crucial step allows them to firm up; they are quite fragile and soft when hot but will harden beautifully as they cool. After cooling slightly, carefully remove the shells from the mold and place them on a wire rack to cool completely. Repeat this process until all the dough is used.
- Prepare the Filling: While the cookie shells are cooling, prepare the luscious filling. In a medium bowl, beat together the dulce de leche, softened unsalted butter, soft cream cheese, and apricot preserves. Continue beating just until all ingredients are thoroughly combined and the mixture is smooth and creamy. Avoid over-beating to maintain its texture.
- Assemble the Oreshki: Take one cooled cookie half and generously fill it with the dulce de leche cream using a small spoon or a piping bag. Take a second cooled cookie half and gently press it onto the filled half, creating a complete walnut shape. Any excess filling that squeezes out can be carefully scraped off with a small knife or spatula.
- Chill and Garnish: After assembling all the walnut cookies, arrange them on a tray and chill them in the refrigerator for at least 30 minutes. This helps the filling set and the cookies become more stable. Before serving, for an elegant finish, dust the assembled Oreshki with a fine layer of powdered sugar.

Rate
Pin
Walnut Cookies – Oreshki
Ingredients
-
COOKIE DOUGH:
-
4 sticks plus 3 TBSP of unsalted butter softened (that’s 500 grams of butter)
-
6 hard-boiled egg yolks grated
-
2 cups of powdered sugar
-
4 cups all-purpose flour
-
FILLING:
-
1 1/2 cans of dulce de leche
-
4 tbsp unsalted butter softened
-
4 oz soft cream cheese
-
1 TBSP apricot preserves
Instructions
-
Beat together the cooked grated egg yolks, softened butter, and sugar. Add the flour and knead together until a soft dough forms. (Dough should resemble a soft play-dough like dough and not stick to your fingers.)
-
Shape dough into little balls using a teaspoon measuring scoop. Press the balls into the oven mold and bake cookies 25 minutes in a preheated 375°F oven.
-
Let cookies cool 3 minutes before removing from the mold (these are fragile when hot but once slightly cooled they harden.) Repeat process.
-
TO MAKE FILLING: Beat together all the filling ingredients just until combined.
-
Fill each cookie half with the filling and join every two shells together. Chill after assembling and dust with powdered sugar for garnish.
Notes
The recipe calls for hard-boiled egg yolks ONLY. Not sure what it does but these cookies turn out super tender. Grate only the cooked yolks for the recipe.
Nutrition per serving
Expert Tips for Oreshki Perfection:
- Dough Consistency is Key: The dough should be soft, pliable, and just barely sticky. If it’s too dry, your shells will be crumbly. If it’s too wet, they might stick to the mold or be difficult to shape. Adjust with small amounts of flour or softened butter if needed.
- Grating Egg Yolks: Don’t skip grating the hard-boiled egg yolks! This unique ingredient is what gives the Oreshki shells their incredibly tender and delicate texture, a hallmark of a truly authentic walnut cookie.
- Don’t Overfill Molds: When pressing the dough balls into the mold, avoid overfilling. A small amount of dough is usually sufficient, as it will expand slightly during baking. Overfilling can lead to uneven shells or difficulty in removing them.
- Gentle Handling: Freshly baked Oreshki shells are very delicate. Always allow them to cool for a few minutes in the mold before attempting to remove them. This cooling period allows them to firm up, making them less prone to breaking.
- Filling Variations: While the dulce de leche, cream cheese, and apricot preserve filling is divine, feel free to experiment! You can add finely chopped walnuts to the filling for extra crunch, or try other spreads like Nutella, peanut butter, or different fruit jams for a twist. Some traditional recipes also include a small amount of the broken cookie shell scraps in the filling for added texture.
- Storage: Once assembled, Oreshki can be stored in an airtight container at room temperature for up to 3-4 days, or in the refrigerator for up to a week. For longer storage, they can be frozen for up to a month. Thaw at room temperature before serving.
- Presentation Matters: A light dusting of powdered sugar before serving adds a beautiful, professional touch to your homemade Oreshki, enhancing their visual appeal.
The Enduring Appeal of Russian Walnut Cookies
Oreshki are more than just a sweet treat; they are a culinary connection to a rich cultural past, often evoking memories of childhood, family gatherings, and special occasions. The process of making these walnut cookies, from preparing the dough to carefully filling and assembling each shell, is a labor of love that results in a truly rewarding experience. The crisp, tender cookie shells combined with the rich, creamy dulce de leche filling create a symphony of textures and flavors that captivate every palate.
Whether you’re a seasoned baker looking for an authentic recipe or a curious home cook eager to explore international desserts, mastering Oreshki is a delightful journey. With this detailed guide, including tips on choosing the perfect mold and a step-by-step recipe, you are well-equipped to create these iconic Russian walnut cookies right in your own kitchen. Enjoy the process, share the joy, and savor every bite of your homemade Oreshki!
